Just a quick post to add a modification to a script that's been doing the rounds within the OpsMgr world for the last few years.
There's a management pack available from within the SCOM community that automates the export of your unsealed management packs (which of course contain all of your bespoke customisations and overrides). You can download the management pack for SCOM 2007 from SystemCenterCentral.com here.
This is an excellent tool for maintaing your SCOM 2007 environment, the problem now though is that it won't work with the new and soon to be released System Center 2012 Operations Manager (SCOM2012).
Update January 2013: Since I originally posted this, the System Center community has come up trumps again and a few months back delivered the SCOM 2012 release of this management pack. The new management pack was written by Pete Zerger, Neale Brown, Derek Harkin and Tommy Gunn and can be downloaded from the SystemCenterCentral.com site for free here. As was/is the case with the SCOM 2007 release, this management pack is ESSENTIAL to any SCOM administrator/consultant's toolkit and should be deployed as soon as possible to ensure quick backup and recovery of your unsealed management packs.
This is because of some changes to the Powershell commands that SCOM 2012 uses in comparison to SCOM 2007 R2.
I've taken a small piece of the powershell script from that management pack and made some minor changes to the code to reflect the new 2012 Powershell commands.
Here it is:
$all_mps = get-scmanagementpack
foreach($mp in $all_mps)
{
export-scmanagementpack -managementpack $mp -path "C:\MPBackups"
}
The small difference in the code above in comparison to the old code is that the 'get-managementpack' and 'export-managementpack' commands have been modified in SCOM 2012 to become 'get-scmanagementpack'' and 'export-scmanagementpack'
The above script will first unseal all of your sealed management packs and export them along with the already unsealed ones to a folder called 'C:\MPBackups' on your server.
If you want a script that will simply backup the unsealed management packs only, then use the following (this one will be what most people will probably want to use):
Get-SCOMManagementPack | where {$_.Sealed -eq $false} | export-SCOMmanagementpack -path C:\MPBackups
Now, I could be creative and go through all of the steps required to create an automated task with SCOM 2012 or SCORCH 2012 to run this on a daily basis, but instead, I'll point you in the direction of an excellent series on backing up your SCOM environment from start to finish that was written by a System Center buddy of mine called 'Dieter Wijckmans'.
Check out his posts from the link below and make sure to use the script modifications above if you are backing up your new System Center 2012 Operations Manager environment:
http://scug.be/blogs/dieter/archive/2011/06/22/scom-2007-how-to-backup-your-environment.aspx
Enjoy!
Kevin Greene's IT Blog. This is a blog about all things Cloud and Datacenter!
Tuesday, February 21, 2012
Come along to the Official Irish Launch of Microsoft System Center 2012!
The official Irish and Northern Irish launches for System Center 2012 have been confirmed by Microsoft Ireland for March 22nd in Dublin and March 27th in Belfast.
I've been asked to present a session as one of four speakers alongside the presenting talents of Aidan Finn (MVP Virtual Machine), Damian Flynn (MVP Cloud and Datacenter Management) and Paul Keely (MVP Cloud and Datacenter Management)!
Each event is a full day out and kicks off at 10:00 until 17:00. The Dublin event is being held in the Berkley Court Hotel and the Belfast event is being held at the Hilton Hotel.
Here's the agenda for the day:
And here's the BIO's for each of the speakers:
Damian Flynn (MVP – System Center Cloud & Data Centre), works for Lionbridge Technologies (a Localisation, Logo Certification, Search & Content Services Company) as a Technical Architect of Corporate IT Infrastructure, working with the Business Stakeholders, IT Team, and Partners. Damian is a member of the Microsoft Windows Sever Futures Council, actively participating in multiple Microsoft TAP programs, and has being working on infrastructure technologies since 1994, with a high level of experience in Networking, Storage, Linux and Windows Servers, Virtualisation, System Center, etc. He blogs on http://www.damianflynn.com, tweets from time to time on @damian_flynn, and is a contributing author on the forthcoming book “Microsoft Private Cloud Computing”.
Kevin Greene (Subject Matter Expert – Microsoft System Center Operations Manager), works for Ergo Group Ireland. Kevin has been responsible for the deployment of a large number of System Center projects to enterprise level clients across all sectors. He blogs at http://kevingreeneitblog.blogspot.com and you can also find him on Twitter as @kgreeneit
Paul Keely (MVP – System Center Cloud & Data Centre), Paul has been working with System Center in its original from form for nearly ten years. He works for Infront Consulting group, a specialist system center practice that deploys system center to some of the biggest companies in the world.
You can register for the event on the Irish IT Pro website by clicking on the link below:
http://blogs.technet.com/b/ieitpro/archive/2012/02/21/system-centre-2012-launch-events-in-dublin-and-belfast.aspx
Registration places have already been filled so hurry up before it's booked out and I hope to see you there!!
I've been asked to present a session as one of four speakers alongside the presenting talents of Aidan Finn (MVP Virtual Machine), Damian Flynn (MVP Cloud and Datacenter Management) and Paul Keely (MVP Cloud and Datacenter Management)!
Each event is a full day out and kicks off at 10:00 until 17:00. The Dublin event is being held in the Berkley Court Hotel and the Belfast event is being held at the Hilton Hotel.
Here's the agenda for the day:
| Time | Session |
| 10:00 – 10:30 | Event Registration |
| 10:30 – 11:30 | Hear how Microsoft takes the experience of running the largest datacentres in the world and applies it to scalable management solutions for customers worldwide |
| 11:30 – 12:00 | Damian Flynn from Lionbridge Technologies shares the cost savings and efficiencies achieved from implementing System Center |
| 12:00 – 13:00 | Lunch |
| 13:05 – 16:15 | Real-world examples from Industry Experts |
| Demonstration based sessions sharing scenarios that you can take and apply to your business. Examples include Deep Application Insights, Cloud and Data Centre – Automation and managing from the desktop to the datacentre |
And here's the BIO's for each of the speakers:
Subject Matter Experts
Aidan Finn (MVP - Virtual Machine), works for MicroWarehouse Ltd as a technical sales lead, working with Microsoft partners on Hyper-V, System Center and Forefront opportunities. He has been working with systems management technologies since 1996, and is experienced with Windows Server, desktop deployment and management, System Center, virtualisation, and so on. He blogs on http://www.aidanfinn.com, tweets as @joe_elway, and has written or contributed to books such as Mastering Hyper-V Deployment and Mastering Windows 7 Deployment.Damian Flynn (MVP – System Center Cloud & Data Centre), works for Lionbridge Technologies (a Localisation, Logo Certification, Search & Content Services Company) as a Technical Architect of Corporate IT Infrastructure, working with the Business Stakeholders, IT Team, and Partners. Damian is a member of the Microsoft Windows Sever Futures Council, actively participating in multiple Microsoft TAP programs, and has being working on infrastructure technologies since 1994, with a high level of experience in Networking, Storage, Linux and Windows Servers, Virtualisation, System Center, etc. He blogs on http://www.damianflynn.com, tweets from time to time on @damian_flynn, and is a contributing author on the forthcoming book “Microsoft Private Cloud Computing”.
Kevin Greene (Subject Matter Expert – Microsoft System Center Operations Manager), works for Ergo Group Ireland. Kevin has been responsible for the deployment of a large number of System Center projects to enterprise level clients across all sectors. He blogs at http://kevingreeneitblog.blogspot.com and you can also find him on Twitter as @kgreeneit
Paul Keely (MVP – System Center Cloud & Data Centre), Paul has been working with System Center in its original from form for nearly ten years. He works for Infront Consulting group, a specialist system center practice that deploys system center to some of the biggest companies in the world.
You can register for the event on the Irish IT Pro website by clicking on the link below:
http://blogs.technet.com/b/ieitpro/archive/2012/02/21/system-centre-2012-launch-events-in-dublin-and-belfast.aspx
Registration places have already been filled so hurry up before it's booked out and I hope to see you there!!
Monday, February 13, 2012
SCOM 2012 - The Upgrade Helper Management Pack
Following on from my last post on creating a custom RDP alert task in SCOM2012, this is a quick post to demonstrate the new SCOM 2012 Upgrade Helper Management Pack that assists in the in-place upgrade of your SCOM 2007 R2 environment to SCOM 2012.
The in-place upgrade process is real easy but it's important that a number of installation steps are carried out in an exact sequence, otherwise you end up making a whole lot of extra work for yourself!
This is where the SCOM 2012 Upgrade Helper Management Pack comes in handy. Once it's installed onto your SCOM 2007 R2 RMS, you can then open it up and review which servers and agents are next to be upgraded to SCOM 2012 as per the upgrade best practices.
To install the Upgrade Helper Management Pack, firstly download the SCOM 2012 Release Candidate from the link below:
http://technet.microsoft.com/en-ie/evalcenter/hh505660.aspx
Once you have downloaded the Release Candidate, run the 'SCOM2012.exe' file and expand the contents to a location of your choosing.
Now browse to the location that you expanded the files to and double click on the 'Management Packs' folder as in the screen below

When you go into the 'Management Packs' folder, you should see the 'OperationsManager.Upgrade.mp' file inside. This is the file that we will be importing into SCOM 2007R2 to assist with the upgrade process.


In the 'Import Management Packs' wizard, click on the 'Add' button and then select 'Add from disk'

Browse to the location that you exported your SCOM2012 media to and ensure you open up the 'Management Packs' folder. When here, locate and then double click on the 'OperationsManager.Upgrade.mp' file

Back in the wizard, ensure that the management pack is ready to import and then click on the 'Install' button to begin the short installation process

Once the Management Pack install is complete, you should see a status of 'Imported' in the window. Click on the 'Close' button to complete the import process.

Now, go back to the 'Monitoring' tab and you should see a new folder called 'Operation Manager Upgrade MP'. When you expand this folder, you will see 5 steps listed that will show the relevant management servers, gateway servers, Windows agents, Unix/Linux agents and RMS and databases that need to be upgraded and the order that the upgrade needs to be carried out in.

If your server/agent has a yellow exclamation symbol beside it within one of the steps, then this server or agent hasn't yet been upgraded to SCOM2012 and needs to be done. If the server/agent shows a green symbol beside it, then it has already been upgraded to SCOM2012 and you can move onto the next step of the upgrade process.
In a small environment, this MP may not be of much use as the step by step process is easier, the less servers and agents you have. However, in a large environment such as the one I just upgraded last weekend where you have a number of different SCOM Management Servers, Gateway Servers, Cross Platform and Windows agents, then you will definitely get some benefit from first deploying it as an assistant to your upgrade.
The in-place upgrade process is real easy but it's important that a number of installation steps are carried out in an exact sequence, otherwise you end up making a whole lot of extra work for yourself!
This is where the SCOM 2012 Upgrade Helper Management Pack comes in handy. Once it's installed onto your SCOM 2007 R2 RMS, you can then open it up and review which servers and agents are next to be upgraded to SCOM 2012 as per the upgrade best practices.
To install the Upgrade Helper Management Pack, firstly download the SCOM 2012 Release Candidate from the link below:
http://technet.microsoft.com/en-ie/evalcenter/hh505660.aspx
Once you have downloaded the Release Candidate, run the 'SCOM2012.exe' file and expand the contents to a location of your choosing.
Now browse to the location that you expanded the files to and double click on the 'Management Packs' folder as in the screen below

When you go into the 'Management Packs' folder, you should see the 'OperationsManager.Upgrade.mp' file inside. This is the file that we will be importing into SCOM 2007R2 to assist with the upgrade process.

To import the Management Pack, on your SCOM 2007R2 Root Management Server (RMS), go to the 'Administration' tab and then right mouse click on the 'Management Packs' link in the window on the left hand side. From the drop down menu, select 'Import Management Packs' to open the wizard

In the 'Import Management Packs' wizard, click on the 'Add' button and then select 'Add from disk'

Browse to the location that you exported your SCOM2012 media to and ensure you open up the 'Management Packs' folder. When here, locate and then double click on the 'OperationsManager.Upgrade.mp' file

Back in the wizard, ensure that the management pack is ready to import and then click on the 'Install' button to begin the short installation process

Once the Management Pack install is complete, you should see a status of 'Imported' in the window. Click on the 'Close' button to complete the import process.

Now, go back to the 'Monitoring' tab and you should see a new folder called 'Operation Manager Upgrade MP'. When you expand this folder, you will see 5 steps listed that will show the relevant management servers, gateway servers, Windows agents, Unix/Linux agents and RMS and databases that need to be upgraded and the order that the upgrade needs to be carried out in.

If your server/agent has a yellow exclamation symbol beside it within one of the steps, then this server or agent hasn't yet been upgraded to SCOM2012 and needs to be done. If the server/agent shows a green symbol beside it, then it has already been upgraded to SCOM2012 and you can move onto the next step of the upgrade process.
In a small environment, this MP may not be of much use as the step by step process is easier, the less servers and agents you have. However, in a large environment such as the one I just upgraded last weekend where you have a number of different SCOM Management Servers, Gateway Servers, Cross Platform and Windows agents, then you will definitely get some benefit from first deploying it as an assistant to your upgrade.
Thursday, February 9, 2012
SCOM 2012 - Run Remote Desktop from any alert in the Console
It has been a real busy few weeks for me in work and I've hardly had any time to blog/tweet about System Center 2012 since the middle of January!
Since my last post, I've been working on a mixture of System Center and Hyper-V projects both day and night so a severe lack of sleep distracted me from posting this really neat trick I've worked out to make managing and resolving alerts in SCOM much easier from the console.
The steps outlined in this post although referencing System Center 2012 Operations Manager, will work exactly the same for System Center Operations Manager 2007 R2.
I was working on System Center 2012 Operations Manager (SCOM) yesterday and was tuning out some alerts generated by some new management packs I had deployed when I found myself having to logon to the servers generating the alerts using Remote Desktop quite regularly.
Now, if the alert generated in SCOM is from the 'Windows Server Operating System' management pack, then this management pack comes with some built in 'Tasks' that can be run from the 'Tasks/Actions' menu on the right hand side of the screen.
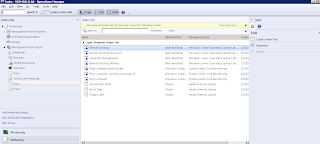
These tasks can be seen from the Monitoring window below once you have clicked on an alert in the Console that was generated by the Windows Server OS MP


As we can see from above, one of these Windows Server Operating System Management Pack tasks is the ' Remote Desktop' task
When you click on the 'Remote Desktop' task, it then opens up the RDP application (mstsc.exe) with the computer name of the server that generated the alert in SCOM and all you have to do is click once to connect to the server to carry on your troubleshooting and alert tuning.
Now, this is all well and good if you are troubleshooting an alert that is related to the Windows Server Operating System Management Pack. What if the alert has been generated by another Management Pack? The answer is simple enough - you don't get the Remote Desktop task!!
The screenshots below show an example of the different tasks/actions that come with the SQL Management Pack


The tasks that come with the SQL Management Pack are specific to SQL Server troubleshooting and completely different to the Windows Server Operating System Management Pack tasks. Although the Management Pack specific tasks are really helpful and can assist in resolving most alerts quickly, if I wanted to Remote Desktop to the SQL server generating the alert above, I would either have to initiate an RDP connection myself from the 'Run' command using 'mstsc.exe' or if I wanted to use SCOM to initiate the RDP connection, I'd have to browse to the 'Windows Server' view or the 'Discovered Inventory' view to kick off the connection.
I just found having to carry out these extra steps on a constant basis was getting to be a bit of a pain and I started out looking for a solution to enable the RDP connection from any alert within the SCOM Console irregardless of the Windows Server OS Management Pack.
The solution to this problem is to create our own custom RDP task that will run independently of any management pack but with the same parameters as the 'Windows Server OS MP' RDP task.
To begin creating the new task, open up the System Center 2012 Operations Manager Console and click on the 'Authoring' tab from the wunderbar down the bottom left hand side.
Now click on 'Tasks' on the left hand side and then 'Change Scope' from the middle of the screen and modify the search scope to be just 'Windows Server'
You should see all of the tasks associated with the 'Windows Server Operating System' Management Pack as below
Double click on the 'Remote Desktop' task in the central window and have a look at the pre-defined parameters


Copy the text from the 'Application' line in the window above into a text editor such as Notepad and you should have a line like this:
%windir%\system32\mstsc.exe
Note that the 'Parameters' line of the screen above has a specific parameter that defines the 'Microsoft.Windows.Computer' class. There's no point in copying this line to your text editor as it won't work when we go to create our new custom RDP task.
Close the RDP task properties that's open from above and then select the 'Create New Task' option from either the 'Task' menu on the right hand side or by right mouse clicking on the 'Tasks' link on the left hand side.
When the 'Create Task Wizard' opens up, click on the 'New' button to create a new custom unsealed management pack so as to store the new custom task

Input a name and description into the relevant fields for the custom unsealed management pack and then click 'Next'

In the final screen of the 'Create a Management Pack' wizard, click on the 'Create' button and you will then return to the 'Create Task Wizard' screen with your new unsealed management pack selected as a destination as shown below.

Make sure you select the 'Alert Command Line' option under 'Console Tasks' and then click 'Next' to continue
From the screen below, enter a task name such as 'Run Remote Desktop' (try not to name it simply 'Remote Desktop' as you may get mixed up at a later date if you are trying to troubleshoot issues with this task or the original 'Remote Desktop' task from the 'Windows Server OS' MP. Type a description and then click 'Next' to continue

Now, it's at this step that you will run into problems (as I did when I got to this point initially!), if you don't enter in the information exactly as I specify.
In the 'Application' field, copy the text path to your RDP application from your text editor that you had saved earlier and you should have something like:
%windir%\system32\mstsc.exe
I ran into problems when trying to find a parameter that would work that could automatically add in the computer name reference that was generating the alert in the SCOM Console once the RDP connection prompt opened up. Thankfully after loads of searching and reading up on SCOM powershell commands, I came up with the 'secret sauce' solution to make this work!!
If you want to run the 'mstsc.exe' application while specifying a server, you need to use the /v:servername switch. However as we won't be entering in a new server name manually each time we fire up an RDP connection, I needed to find the correct reference that SCOM uses and I came across $MonitoringObjectPath$
With the above syntax worked out, all we need to type into the 'Parameters' field is the following:
/v: $MonitoringObjectPath$

The last setting we need to make in the screen above is to de-select the 'Display output when this task is run' option and then click on the 'Create' button to complete the process
Now, if you go back to the 'Monitoring' tab of the SCOM Console and click on any alert, you should now see an additional 'Alert Tasks' menu on the right hand side of the screen with an entry for 'Run Remote Desktop' as the two screens below show.


This new 'Alert Tasks' menu will appear above the specific management pack tasks menu every time you click on an alert. The example above shows the 'SQL' specific tasks along with the new 'Alert Tasks' option and the screen below shows the 'Windows Server 2008 Logical Disk Tasks ' also with the new 'Alert Tasks' option above it.

If the alert that is being generated in the SCOM Console has been generated by a Windows Server with the SCOM agent installed, then your new 'Run Remote Desktop' custom task will run every time making it nice and easy to troubleshoot and keeping all administrative duties within the single SCOM Management Server.
Since my last post, I've been working on a mixture of System Center and Hyper-V projects both day and night so a severe lack of sleep distracted me from posting this really neat trick I've worked out to make managing and resolving alerts in SCOM much easier from the console.
The steps outlined in this post although referencing System Center 2012 Operations Manager, will work exactly the same for System Center Operations Manager 2007 R2.
I was working on System Center 2012 Operations Manager (SCOM) yesterday and was tuning out some alerts generated by some new management packs I had deployed when I found myself having to logon to the servers generating the alerts using Remote Desktop quite regularly.
Now, if the alert generated in SCOM is from the 'Windows Server Operating System' management pack, then this management pack comes with some built in 'Tasks' that can be run from the 'Tasks/Actions' menu on the right hand side of the screen.
These tasks can be seen from the Monitoring window below once you have clicked on an alert in the Console that was generated by the Windows Server OS MP

A closer look shows us all of the available tasks that we can run under this context
As we can see from above, one of these Windows Server Operating System Management Pack tasks is the ' Remote Desktop' task
When you click on the 'Remote Desktop' task, it then opens up the RDP application (mstsc.exe) with the computer name of the server that generated the alert in SCOM and all you have to do is click once to connect to the server to carry on your troubleshooting and alert tuning.
Now, this is all well and good if you are troubleshooting an alert that is related to the Windows Server Operating System Management Pack. What if the alert has been generated by another Management Pack? The answer is simple enough - you don't get the Remote Desktop task!!
The screenshots below show an example of the different tasks/actions that come with the SQL Management Pack


The tasks that come with the SQL Management Pack are specific to SQL Server troubleshooting and completely different to the Windows Server Operating System Management Pack tasks. Although the Management Pack specific tasks are really helpful and can assist in resolving most alerts quickly, if I wanted to Remote Desktop to the SQL server generating the alert above, I would either have to initiate an RDP connection myself from the 'Run' command using 'mstsc.exe' or if I wanted to use SCOM to initiate the RDP connection, I'd have to browse to the 'Windows Server' view or the 'Discovered Inventory' view to kick off the connection.
I just found having to carry out these extra steps on a constant basis was getting to be a bit of a pain and I started out looking for a solution to enable the RDP connection from any alert within the SCOM Console irregardless of the Windows Server OS Management Pack.
The solution to this problem is to create our own custom RDP task that will run independently of any management pack but with the same parameters as the 'Windows Server OS MP' RDP task.
To begin creating the new task, open up the System Center 2012 Operations Manager Console and click on the 'Authoring' tab from the wunderbar down the bottom left hand side.
Now click on 'Tasks' on the left hand side and then 'Change Scope' from the middle of the screen and modify the search scope to be just 'Windows Server'
You should see all of the tasks associated with the 'Windows Server Operating System' Management Pack as below

Double click on the 'Remote Desktop' task in the central window and have a look at the pre-defined parameters


Copy the text from the 'Application' line in the window above into a text editor such as Notepad and you should have a line like this:
%windir%\system32\mstsc.exe
Note that the 'Parameters' line of the screen above has a specific parameter that defines the 'Microsoft.Windows.Computer' class. There's no point in copying this line to your text editor as it won't work when we go to create our new custom RDP task.
Close the RDP task properties that's open from above and then select the 'Create New Task' option from either the 'Task' menu on the right hand side or by right mouse clicking on the 'Tasks' link on the left hand side.
When the 'Create Task Wizard' opens up, click on the 'New' button to create a new custom unsealed management pack so as to store the new custom task

Input a name and description into the relevant fields for the custom unsealed management pack and then click 'Next'

In the final screen of the 'Create a Management Pack' wizard, click on the 'Create' button and you will then return to the 'Create Task Wizard' screen with your new unsealed management pack selected as a destination as shown below.

Make sure you select the 'Alert Command Line' option under 'Console Tasks' and then click 'Next' to continue
From the screen below, enter a task name such as 'Run Remote Desktop' (try not to name it simply 'Remote Desktop' as you may get mixed up at a later date if you are trying to troubleshoot issues with this task or the original 'Remote Desktop' task from the 'Windows Server OS' MP. Type a description and then click 'Next' to continue

Now, it's at this step that you will run into problems (as I did when I got to this point initially!), if you don't enter in the information exactly as I specify.
In the 'Application' field, copy the text path to your RDP application from your text editor that you had saved earlier and you should have something like:
%windir%\system32\mstsc.exe
I ran into problems when trying to find a parameter that would work that could automatically add in the computer name reference that was generating the alert in the SCOM Console once the RDP connection prompt opened up. Thankfully after loads of searching and reading up on SCOM powershell commands, I came up with the 'secret sauce' solution to make this work!!
If you want to run the 'mstsc.exe' application while specifying a server, you need to use the /v:servername switch. However as we won't be entering in a new server name manually each time we fire up an RDP connection, I needed to find the correct reference that SCOM uses and I came across $MonitoringObjectPath$
With the above syntax worked out, all we need to type into the 'Parameters' field is the following:
/v: $MonitoringObjectPath$

The last setting we need to make in the screen above is to de-select the 'Display output when this task is run' option and then click on the 'Create' button to complete the process
Now, if you go back to the 'Monitoring' tab of the SCOM Console and click on any alert, you should now see an additional 'Alert Tasks' menu on the right hand side of the screen with an entry for 'Run Remote Desktop' as the two screens below show.


This new 'Alert Tasks' menu will appear above the specific management pack tasks menu every time you click on an alert. The example above shows the 'SQL' specific tasks along with the new 'Alert Tasks' option and the screen below shows the 'Windows Server 2008 Logical Disk Tasks ' also with the new 'Alert Tasks' option above it.
If the alert that is being generated in the SCOM Console has been generated by a Windows Server with the SCOM agent installed, then your new 'Run Remote Desktop' custom task will run every time making it nice and easy to troubleshoot and keeping all administrative duties within the single SCOM Management Server.
Subscribe to:
Posts (Atom)